
Screens
Register and pair a new display, schedule its content, check downloaded files, and monitor device status and location from the Loopvew CMS.
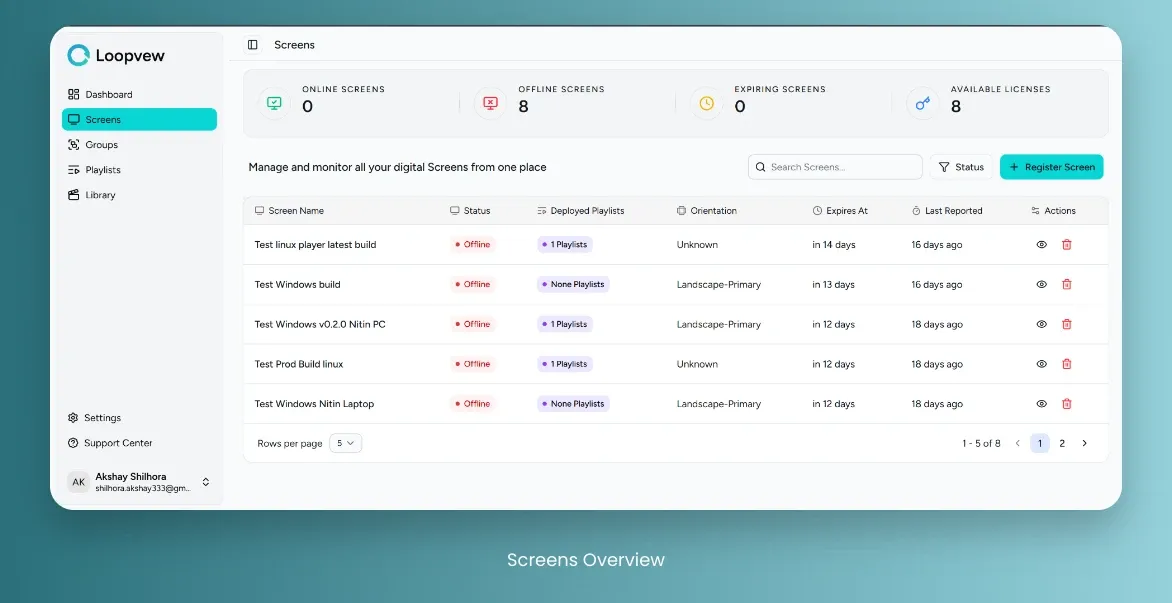
Screens Overview
Screens Stats: top bar shows the screen stats:
- Online screens: Screens that are currently connected to server.
- Offline screens: Screens that are not connected to server.
- Available Licenses: Total number of licenses available.
- Expiring Screens: Screens that will be expiring in next 30 days.
Screens Table: shows the list of all screens with following details:
- Screen Name: Name of the screen.
- Deployed Playlists: No of playlists deployed on the screen.
- Status: Online/Offline status of the screen.
- Orientation: Orientation of the screen.
- Expiry At: Expiry date of the screen license.
- Last Reported: Last reported days from today.
- Action: View and Settings button to manage the screen.
View All Screens
Open the Screens tab to see every registered display, its status, and its license.
-
Click on the Screens tab in the left sidebar.
The Screens table lists every registered display.
Pair a New Screen
Register a screen by entering its name and the 6-digit pairing code shown on the display.
-
Go to the Screens tab in the left sidebar.
-
Select the Register Screen button.
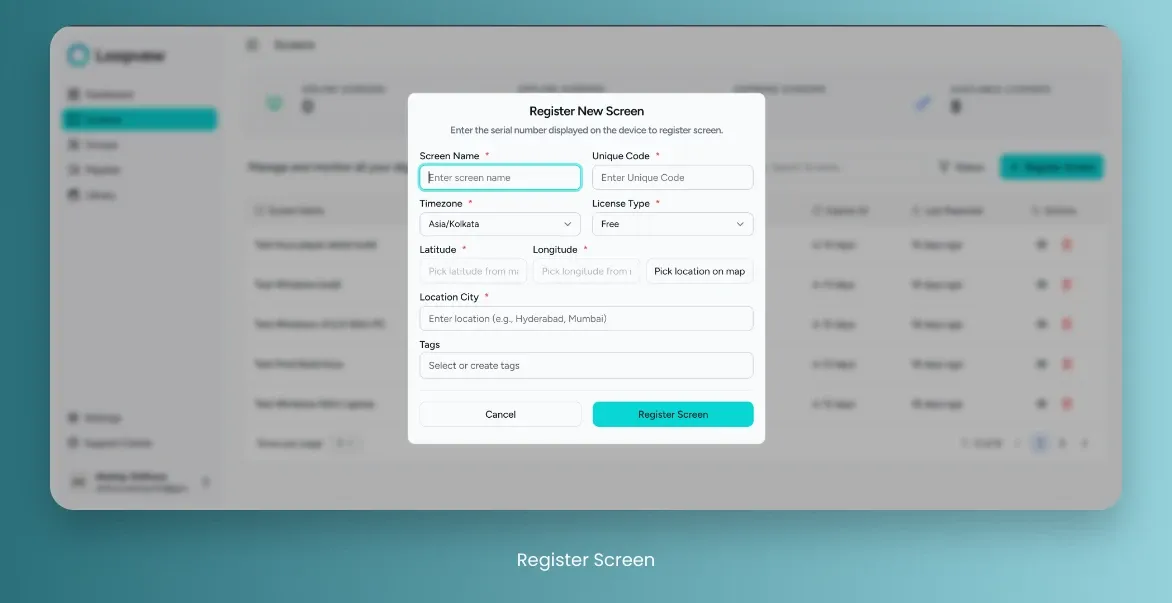
The Register Screen dialog — name, pairing code, time zone, license, and location. -
Enter the name of the screen to distinguish from other screens.
- For example: Entrance Display, First Floor Display, or Lift Block B.
-
Enter the 6-digit pairing code displayed on the screen.
- For example: 928721 is the code displayed on the screen.
- Enter the same code in the CMS Register Screen window. `
- For example: 928721 is the code displayed on the screen.
-
Pick the time zone where screen is located.
- For example: Asia/Kolkata, Europe/London, or Asia/Tokyo.
-
Pick the license Type.
- For example: Free or Paid.
-
Pick the location on maps by clicking on Pick location on map.
-
Enter the name of location city, where screen is located.
-
Optionally, assign some Tags to the screen.
-
After Filling all the details, click on Register Screen.
Check the Online/Offline Status of a Screen
A screen’s online or offline status shows in the table and on its detail view.
-
Go to the Screens tab in the left sidebar.
- In the Table Section, you can view the status of each screen.
-
In the Action column, click on the View Button for the screen.
Open a screen from the View action in the table. -
Check the screen status displayed on top right, below active playlists, to see whether the screen is online or offline.
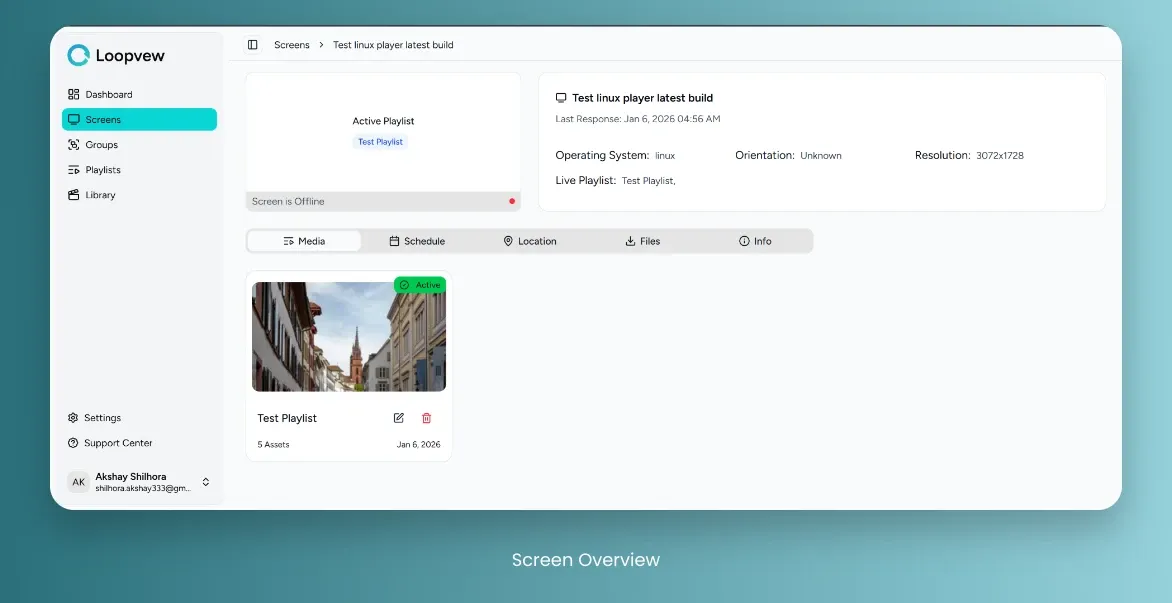
A screen’s detail view — the online/offline status sits below the active playlists.
Check Available Licenses
The Available Licenses count sits in the stats bar at the top of the Screens view.
-
Go to the Screens tab in the left sidebar.
- You can view the Available Licenses in screens stats section.
The Available Licenses count sits in the stats bar.
Check Deployed Playlists on Screen
A screen’s deployed playlists are listed under its Media tab.
-
Go to the Screens tab in the left sidebar.
-
In the Action column, click on the View Button for the screen.
Open a screen from the View action in the table. -
Click on the Media tab to view all deployed playlists on the screen.
The Media tab lists the playlists currently deployed to the screen.
View All Schedules
A screen’s content schedules are listed under its Schedules tab.
-
Go to the Screens tab in the left sidebar.
-
In the Action column, click on the View Button for the screen.
Open a screen from the View action in the table. -
Click on the Schedules tab to view all the schedules on the screen.
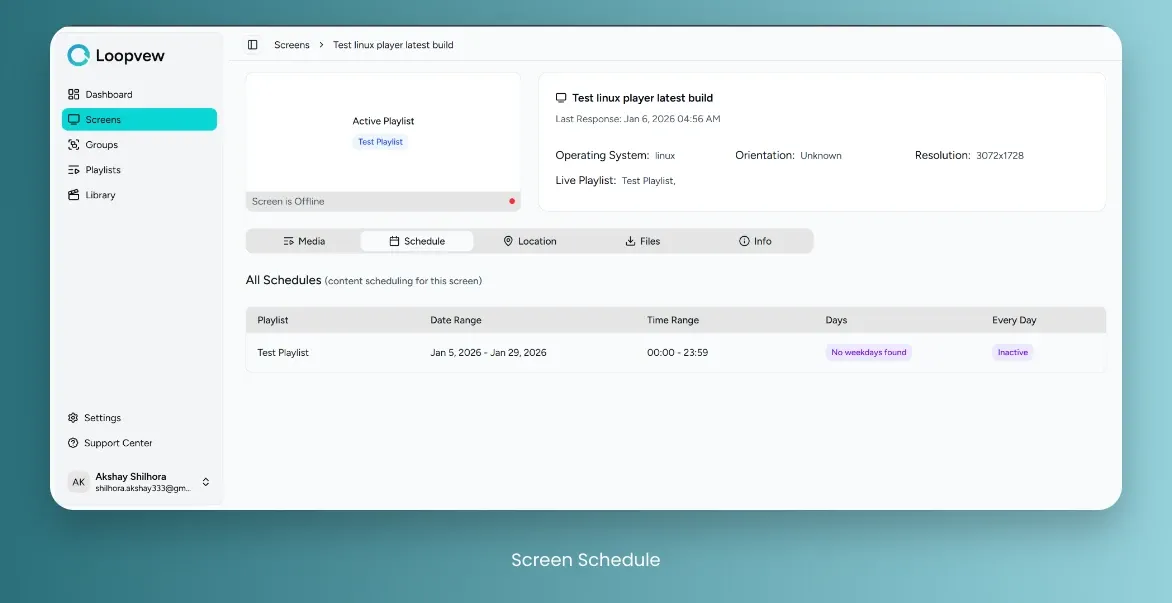
The Schedules tab shows the screen’s content schedule.
Check Screen Location
A screen’s installed location appears on the map under its Location tab.
-
Go to the Screens tab in the left sidebar.
-
In the Action column, click on the View Button for the screen.
Open a screen from the View action in the table. -
Click on the Location tab to view the screen location.
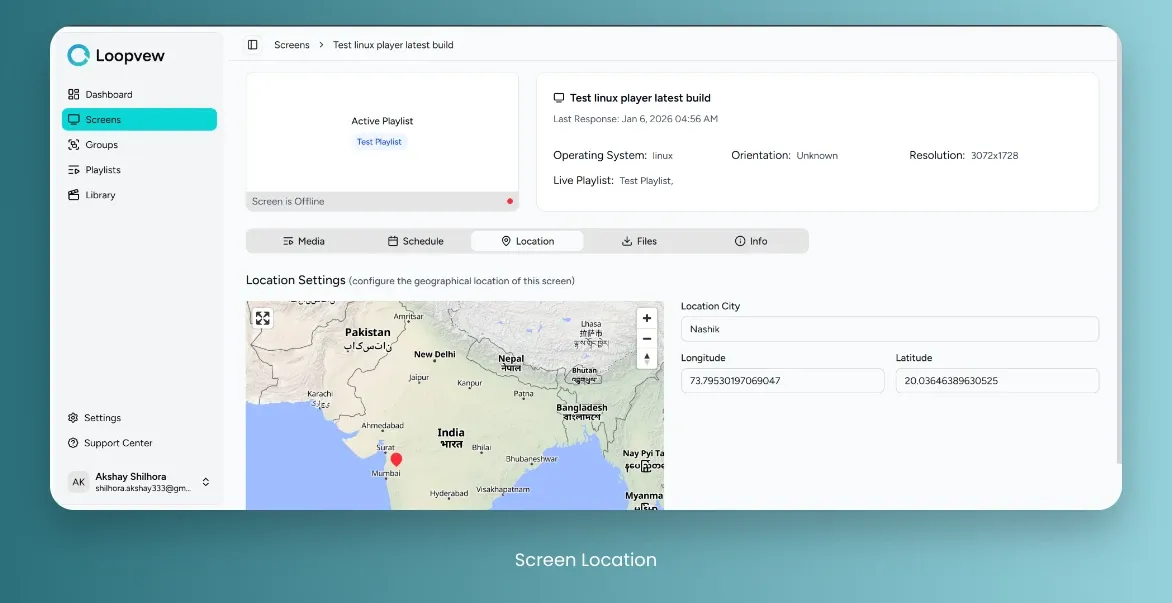
The Location tab maps where the screen is installed.
Check Downloaded Files on a Screen
The media a screen has downloaded is listed under its Files tab.
-
Go to the Screens tab in the left sidebar.
-
In the Action column, click on the View Button for the screen.
Open a screen from the View action in the table. -
Click on the Files tab to view downloaded files on the screen.
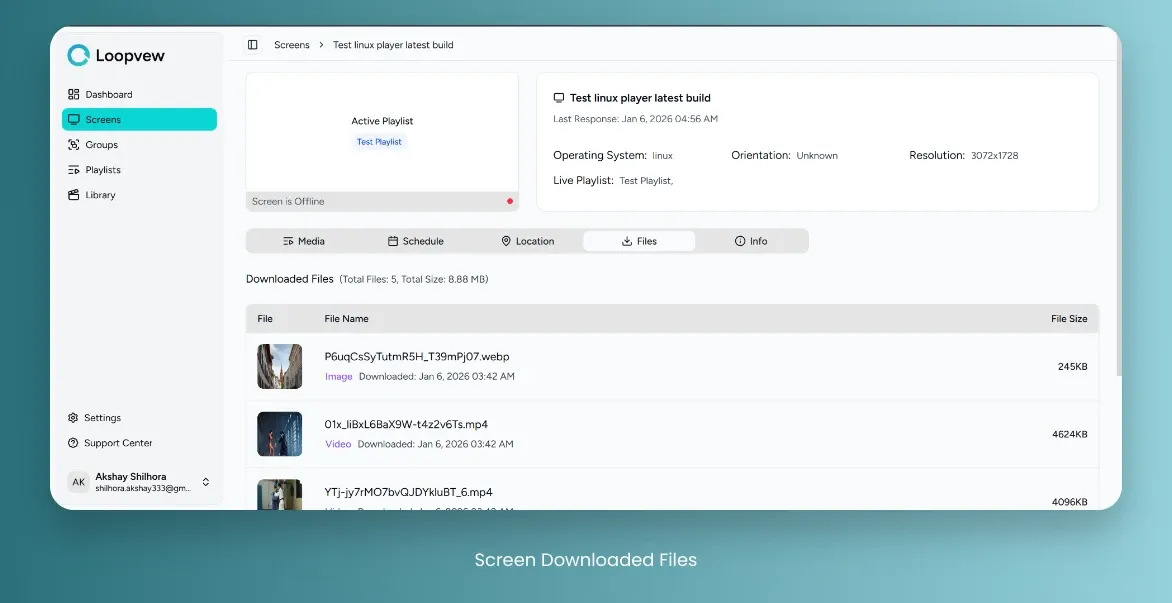
The Files tab lists the media the screen has downloaded.
Check Screen Info
A screen’s device and pairing details are listed under its Info tab.
-
Go to the Screens tab in the left sidebar.
-
In the Action column, click on the View Button for the screen.
Open a screen from the View action in the table. -
Click on the Info tab to view screen information.
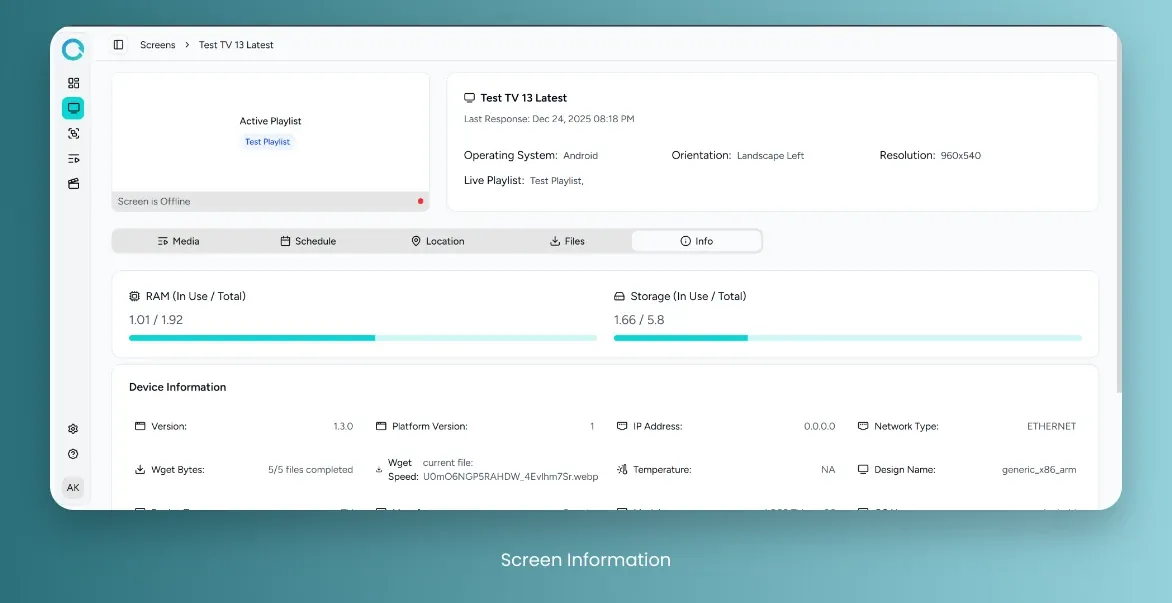
The Info tab shows the screen’s device and pairing details.
Delete a Screen
-
Go to the Screens tab in the left sidebar.
-
In the Action column, click on the Delete Button for the screen you want to delete.
Open the delete action for the screen you want to remove. -
Click on the Delete button to confirm the action.
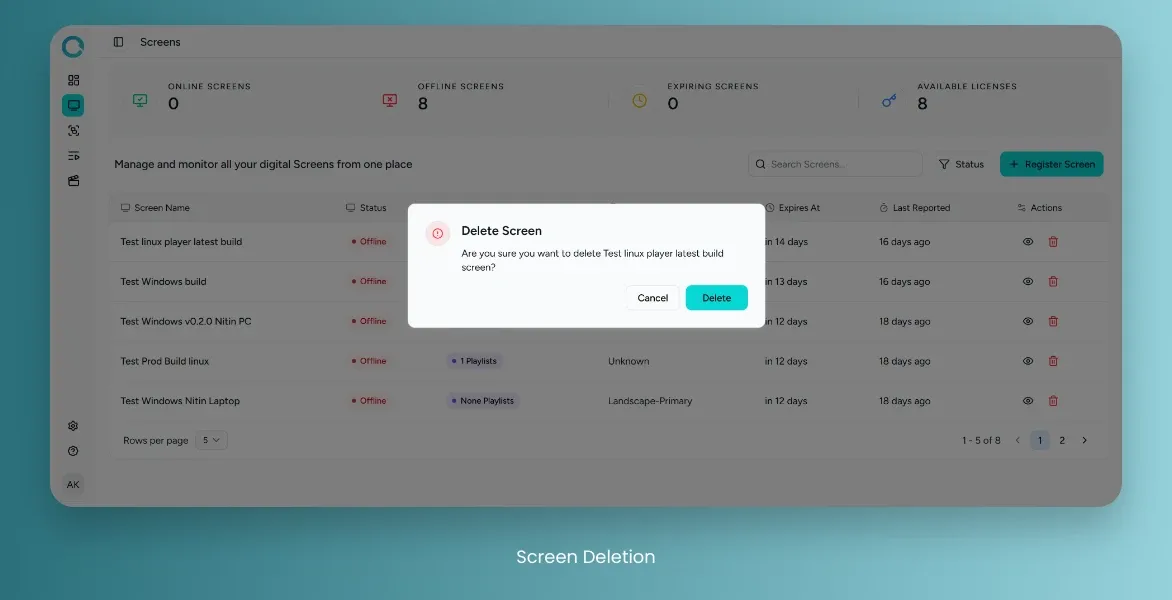
Confirming deletion of a screen — this cannot be undone. -
The screen will be successfully deleted and can not be restored later.